Have you ever wondered how to add a horizontal line in Word to separate sections or paragraphs? Adding a horizontal line can help organize your document and make it visually appealing. In this article, we will guide you through the process of adding a horizontal line in Word, step by step. Whether you are using Microsoft Word 2010, 2013, 2016, or 2019, the process is quite similar. So, let's get started and add some visual flair to your documents!
Before we dive into the steps, here's a quick overview of what we'll cover in this article:
- Adding a Horizontal Line Using the Border Tool
- Inserting a Horizontal Line Using AutoFormat
- Creating a Horizontal Line Using Symbols or Shapes
- Customizing the Appearance of a Horizontal Line
Now, let's begin by exploring the first method of adding a horizontal line using the border tool.
1. Adding a Horizontal Line Using the Border Tool
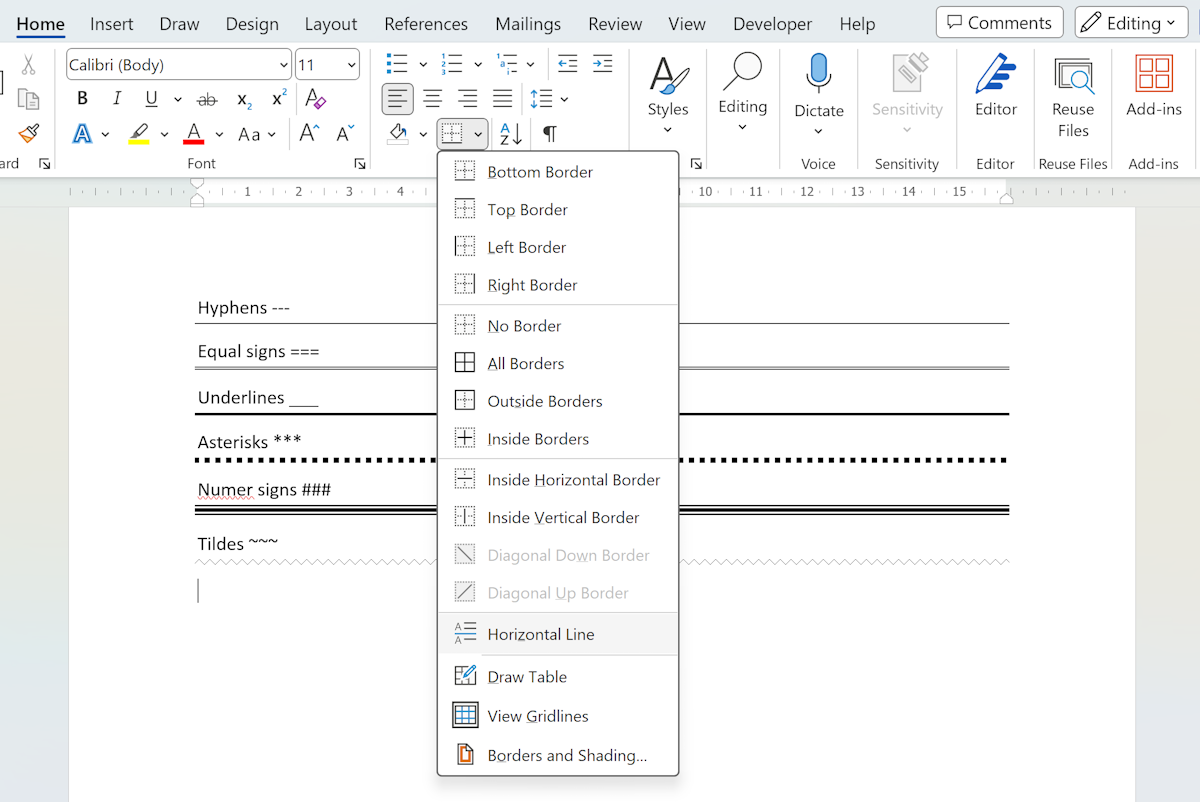
The border tool in Microsoft Word allows you to add lines and borders to paragraphs, pages, or selected text. To add a horizontal line using this method, follow these steps:
Step 1: Place the cursor where you want to insert the horizontal line.
Step 2: Go to the "Home" tab in the Microsoft Word ribbon.
Step 3: Locate the "Paragraph" group and click on the "Borders" button. This will open a drop-down menu.
Step 4: From the drop-down menu, select the "Horizontal Line" option. A horizontal line will be inserted at the position of your cursor.
Step 5: Customize the appearance of the line by adjusting its color, width, and style using the options in the "Borders" drop-down menu.
That's it! You have successfully added a horizontal line using the border tool in Word.
2. Inserting a Horizontal Line Using AutoFormat
Another way to add a horizontal line in Word is by using the AutoFormat feature. AutoFormat automatically applies formatting elements, including horizontal lines, based on certain characters or key combinations. Follow these steps to insert a horizontal line using AutoFormat:
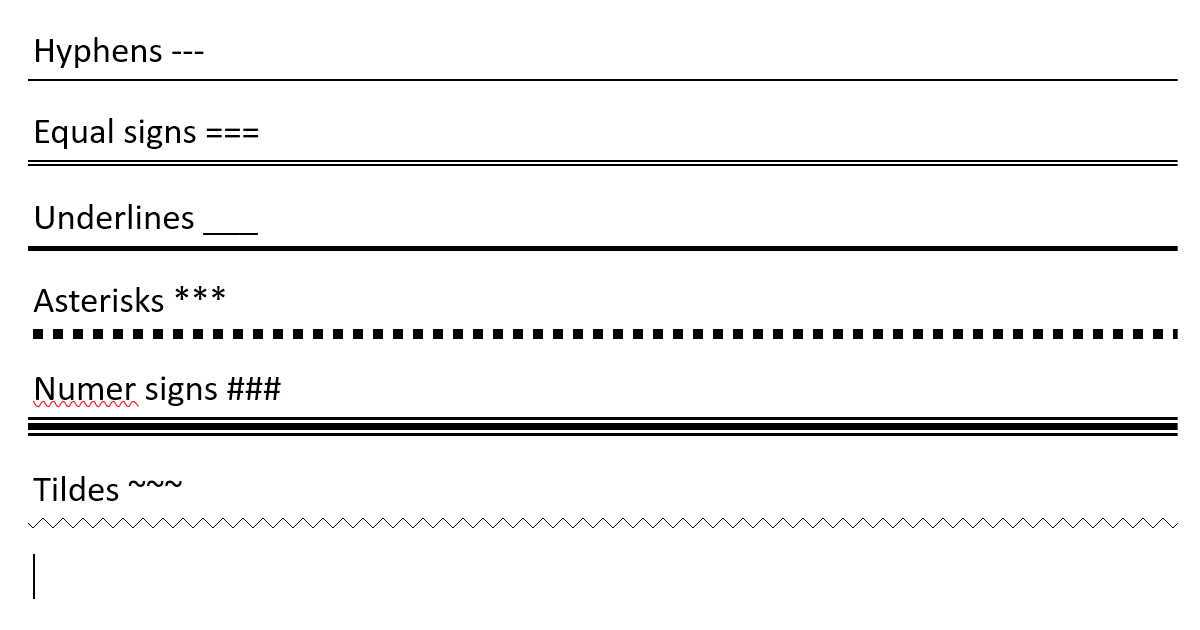
Step 1: Type three hyphens "---" and press Enter. Word will automatically replace the hyphens with a horizontal line.
Step 2: If Word does not automatically convert the hyphens, go to the "File" tab, click on "Options," and select the "Proofing" category.
Step 3: In the "AutoFormat as You Type" section, make sure the "Hyphens (--) with dash (-)" option is checked.
Step 4: Click on the "OK" button to save the changes. Now, when you type three hyphens and press Enter, Word will insert a horizontal line.
Using AutoFormat can save you time and effort by automatically applying formatting elements as you type.
3. Creating a Horizontal Line Using Symbols or Shapes
If you want more customization options for your horizontal line, you can use symbols or shapes available in Word. Here's how you can create a horizontal line using symbols or shapes:
Step 1: Place the cursor where you want the horizontal line to be inserted.
Step 2: Go to the "Insert" tab in the Microsoft Word ribbon.
Step 3: In the "Symbols" group, click on the "Symbol" button. A drop-down menu will appear.
Step 4: Select the "More Symbols" option at the bottom of the drop-down menu. A dialog box will open.
Step 5: In the dialog box, select the "Symbols" tab.
Step 6: From the "Font" drop-down menu, choose "Wingdings" or "Webdings" font. These fonts contain various symbols and shapes.
Step 7: Scroll through the list of symbols and select the horizontal line symbol or shape of your choice.
Step 8: Click on the "Insert" button to insert the selected symbol or shape at the position of your cursor.
Step 9: Customize the appearance of the line by adjusting its size, color, and other formatting options using the options in the "Drawing Tools" or "Format" tab.
Using symbols or shapes gives you more flexibility and creative options when designing your horizontal lines.
4. Customizing the Appearance of a Horizontal Line
Now that you know how to add a horizontal line in Word, let's explore some ways to customize its appearance. Here are a few formatting options you can use to personalize your horizontal lines:
- Color: Change the color of the line to match the theme or style of your document.
- Width: Adjust the thickness or width of the line to make it more prominent or subtle.
- Style: Choose from various line styles such as solid, dashed, dotted, or double.
- Alignment: Position the line to the left, center, or right of the page or paragraph.
- Effects: Apply special effects like shadows or 3D effects to the line.
- Transparency: Make the line partially transparent to create a subtle visual effect.
Experiment with these formatting options to create horizontal lines that enhance the visual appeal of your documents.
Conclusion
Adding a horizontal line in Word is a simple process that can visually enhance your documents. Whether you prefer using the border tool, AutoFormat, or symbols and shapes, you now have multiple methods at your disposal. By customizing the appearance of the line, you can further personalize your documents. So, go ahead and start adding horizontal lines to make your Word documents more visually appealing and organized!
