Are you still printing out documents, signing them by hand, scanning them, and then sending them back? It's time-consuming and inefficient. Thankfully, with advancements in technology, you can now electronically sign Word documents. In this article, we will guide you through the process of electronically signing your Word documents, making your life a whole lot easier.
Before we dive into the specifics of how to electronically sign a Word document, let's quickly discuss what electronic signatures are and how they work. An electronic signature, also known as an e-signature, is a digital counterpart of a traditional handwritten signature. It is a legally binding way to indicate consent or approval on digital documents. Electronic signatures are widely accepted in business, legal, and personal transactions, as they offer convenience, efficiency, and security.
So, let's get started with the steps to electronically sign a Word document.
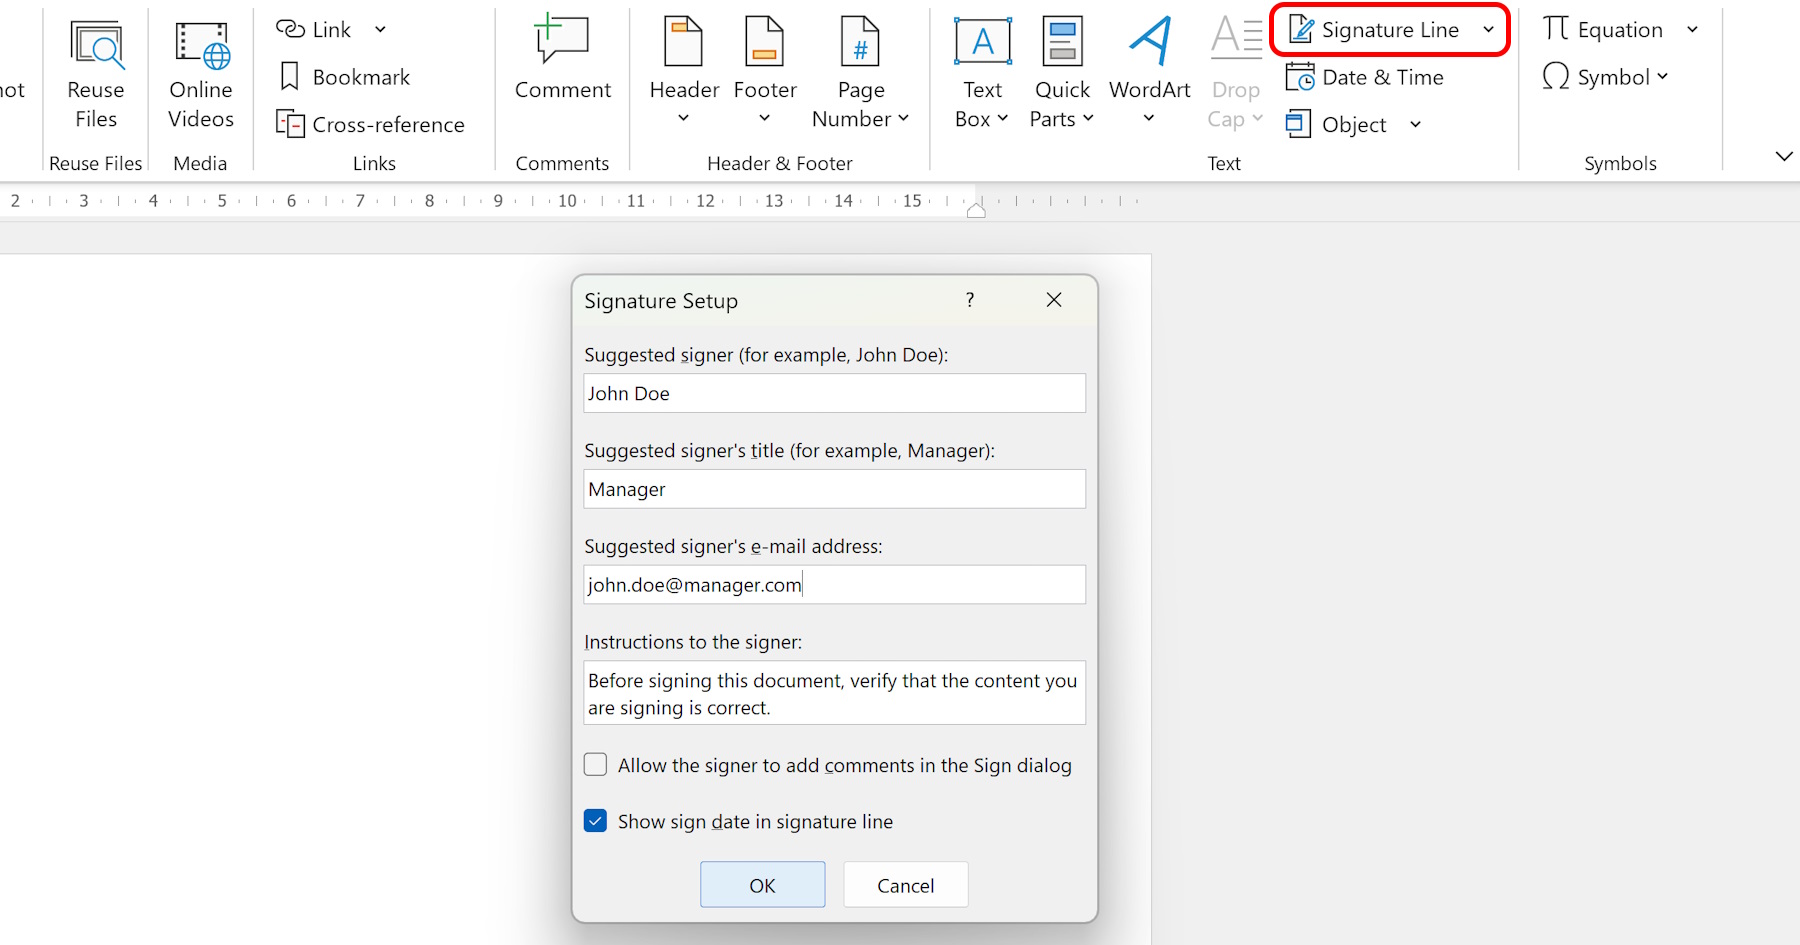
Step 1: Insert a Signature Line
The first thing you need to do is insert a signature line in your Word document. This signature line will indicate where the electronic signature will go. To insert a signature line, follow these steps: 1. Open your Word document. 2. Place the cursor where you want to insert your signature line. 3. Click on the "Insert" tab in the Word toolbar. 4. In the "Text" group, click on "Signature Line". 5. A pop-up window will appear. Fill in the required information, such as the signer's name and email address. 6. Click on "OK". 7. The signature line will now appear in your document.
Step 2: Create a Digital ID
To electronically sign the Word document, you will need a digital ID or digital certificate. A digital ID is a unique electronic credential that verifies your identity and ensures the integrity of your electronic signature. Here's how to create a digital ID: 1. Open a web browser and search for a trusted digital certificate provider. 2. Choose a digital certificate option that suits your needs. 3. Follow the provider's instructions to create and set up your digital ID. 4. Download and install the digital certificate on your computer. 5. Ensure that the digital ID is accessible and recognized by your operating system.
Step 3: Sign the Document
Now that you have your signature line and digital ID set up, it's time to sign the Word document. Here's how to do it: 1. Open your Word document. 2. Double-click on the signature line to open the "Sign" dialog box. 3. In the "Purpose for signing this document" field, enter the reason for signing. 4. Click on "Sign". 5. Authenticate yourself using your digital ID, which may require a password, PIN, or biometric verification. 6. Once authenticated, your digital signature will be applied to the document. 7. Save the document with the electronic signature.
Step 4: Verify the Signature
After electronically signing the Word document, it's important to verify the signature to ensure its authenticity. Here's how to verify the signature: 1. Open the signed Word document. 2. Double-click on the signature line to open the "Signatures" pane. 3. In the "Signatures" pane, select the signature, and click on "Signature Details". 4. A window will appear displaying the signature details, including the signer's information and certificate status. 5. Verify that the signature is valid and that the certificate is trusted. 6. If any issues arise during the verification process, contact the signer to address the problem.
Congratulations! You have successfully electronically signed your Word document. Now you can confidently send your digitally signed document to others, knowing that it is legally binding and secure.
In conclusion, electronically signing Word documents is a game-changer in terms of efficiency and convenience. It eliminates the need for printing, signing, and scanning, saving you time and effort. With the steps outlined in this article, you can easily adopt electronic signatures into your workflow and streamline your document signing process.