Have you ever experienced that sinking feeling when you realize that you've accidentally closed a Word document without saving? It's a frustrating situation, especially if you were working on an important project or report. But don't worry, there are ways to find unsaved Word documents and recover your precious work. In this article, we will explore different methods to help you retrieve those unsaved documents and prevent future mishaps.
Understanding AutoRecover and AutoSave
Before diving into the methods of finding unsaved Word documents, let's understand the two features that Word offers to automatically save your work: AutoRecover and AutoSave.
AutoRecover is a feature in Microsoft Word that automatically saves a backup copy of your document at specified intervals. This feature can be a lifesaver if your computer crashes or if Word unexpectedly closes. By default, AutoRecover saves a copy of your document every 10 minutes.
On the other hand, AutoSave is available if you're using a cloud storage service, such as OneDrive or SharePoint. It automatically saves your changes to the cloud in real-time, ensuring that you never lose your work.
Using the AutoRecover Feature
If you were working on a document and Word crashed or closed accidentally, you can use the AutoRecover feature to locate and recover the unsaved file. Here's how to do it:
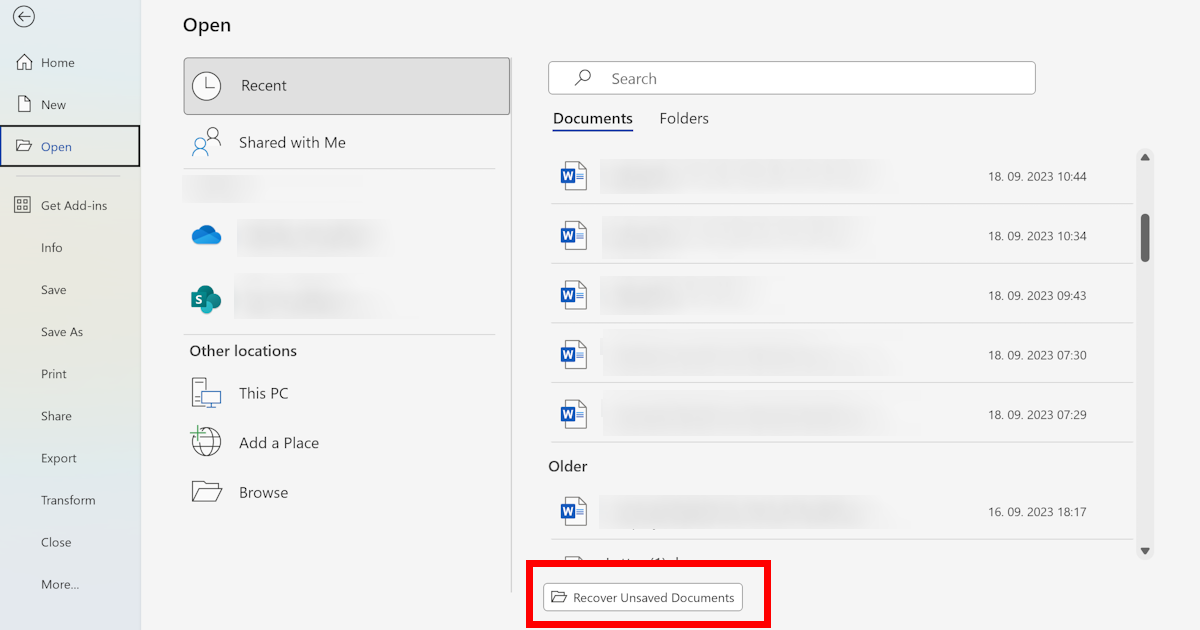
- Open Microsoft Word.
- Click on the "File" tab in the upper-left corner.
- Select "Open" from the menu on the left.
- In the Open dialog box, click on the "Recover Unsaved Documents" button.
- Word will open a new window showing a list of unsaved documents. Select the document you want to recover and click "Open."
- Save the recovered document to a safe location on your computer.
Checking the Temporary Files Folder
When Word crashes or closes unexpectedly, it creates a temporary copy of your document in a specific folder on your computer. You can try locating and recovering your unsaved document from this folder by following these steps:
- Close Microsoft Word.
- Press the "Windows" key + "R" on your keyboard to open the "Run" dialog box.
- Type "%temp%" (without the quotes) in the box and click "OK."
- This will open the Temporary Files folder. Look for files with names starting with "Word" or "ASD."
- Check the files' modified dates and sizes to identify the most recent and potentially relevant one.
- Copy the file to a different location on your computer.
- Change the file's extension from .tmp to .docx.
- Double-click on the recovered file to open it in Microsoft Word. Save it to a safe location.
Checking the Document Recovery Pane
If you experience a crash or accidental closure while working on a Word document, the Document Recovery Pane might automatically open when you relaunch Word. This pane displays a list of unsaved documents. Here's how to check the Document Recovery Pane:
- Open Microsoft Word.
- If the Document Recovery Pane appears, select the document you want to recover and click "Open."
- If the Document Recovery Pane doesn't appear automatically, click on the "File" tab in the upper-left corner.
- Select "Info" from the menu on the left.
- Click on the "Manage Document" drop-down menu and choose "Recover Unsaved Documents."
- Word will open a new window showing a list of unsaved documents. Select the document you want to recover and click "Open."
- Save the recovered document to a safe location on your computer.
Searching for Word Backup Files
Word automatically creates backup copies of your documents, which can be helpful in recovering unsaved work. Follow these steps to search for Word backup files:
- Close Microsoft Word.
- Open the "File Explorer" on your computer.
- Navigate to the following location:
C:\Users\<your username>\AppData\Roaming\Microsoft\Word. - In this folder, look for files with the extension ".wbk" or starting with "~$".
- Check the files' modified dates and sizes to identify the most recent and potentially relevant one.
- Copy the file to a safe location on your computer.
- Change the file's extension from .wbk to .docx.
- Double-click on the recovered file to open it in Microsoft Word. Save it to a safe location.
Preventing Unsaved Document Loss
While it's crucial to know how to find unsaved Word documents, prevention is always better than cure. Here are a few tips to help you avoid losing your work in the future:
- Save your document frequently by pressing "Ctrl" + "S" or using the "Save" button.
- Enable the AutoSave feature if you are using OneDrive or SharePoint for cloud storage.
- Set shorter AutoRecover intervals in Word's options to minimize the amount of work you could potentially lose.
- Enable the feature that prompts you to save the document before closing Word.
- Consider using a cloud-based storage service like OneDrive, Google Drive, or Dropbox for automatic and real-time backups of your files.
In conclusion, losing unsaved Word documents can be a stressful experience, but with the help of Word's built-in features and recovery methods, you can often retrieve your work. Remember to check the AutoRecover feature, temporary files folder, Document Recovery Pane, and Word backup files for any unsaved documents. Additionally, implementing preventive measures will help minimize the risk of future document loss.
