Have you ever wondered how to make your documents in Microsoft Word more visually appealing? Adding a border can give your document a professional and polished look. In this article, we will explore the various methods of inserting borders in Word and provide step-by-step instructions to help you achieve the desired outcome.
Adding a border to your Word document can enhance its appearance and make it stand out. A border can be useful for highlighting important information, creating visually appealing flyers or posters, or simply adding a touch of creativity to your document. In this article, we will guide you through different techniques to insert borders in Word.
Page borders feature
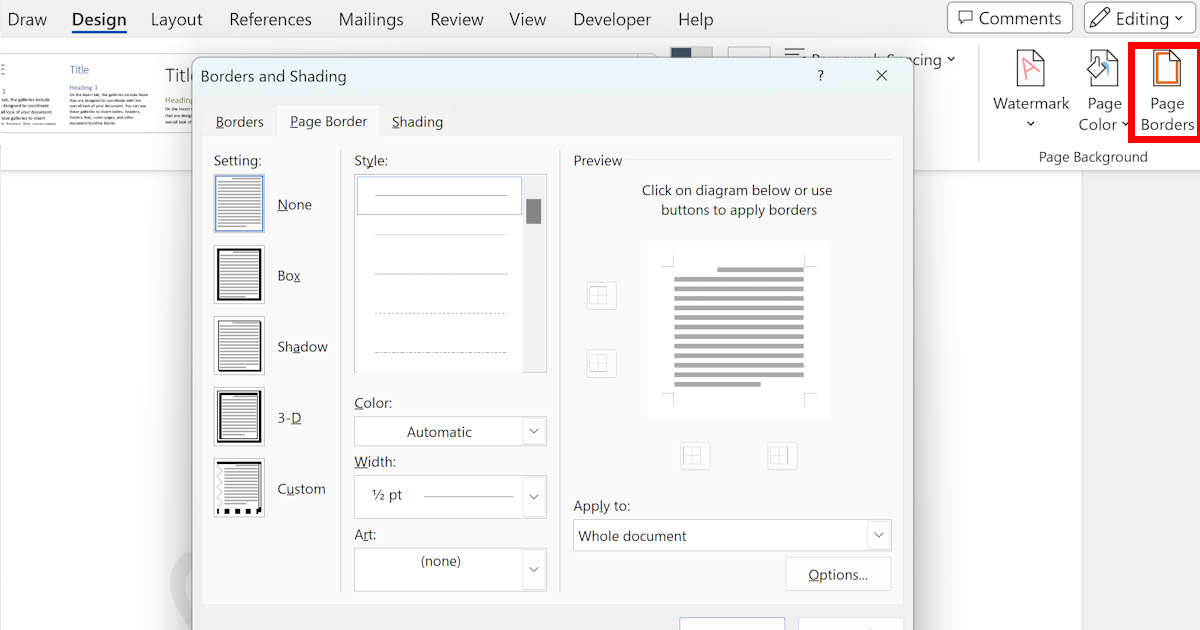
One of the easiest ways to add a border to your Word document is by using the built-in Page Borders feature. To access this feature, go to the "Page Layout" tab and click on the "Page Borders" button in the "Page background" group. A dialog box will appear, offering various border options. You can choose from different line styles, colors, and widths. Additionally, you can select which sides of the document you want the border to appear on. Once you have customized your border, click "OK" to apply it to your document.
In some cases, you may want to add borders only to specific sections of your document. Word allows you to apply borders to individual paragraphs, tables, or even text boxes. To apply a border to a paragraph, simply place your cursor within the paragraph and go to the "Home" tab. In the "Paragraph" group, click on the "Borders" button to select a border style. You can also customize the border by choosing different line styles, colors, and widths. Similarly, you can apply borders to tables and text boxes by selecting the desired object and using the "Borders" button in the "Design" or "Format" tab.
Using tables to set borders
Tables are commonly used in Word documents to present and organize data. Adding borders to tables can improve their readability and make the information more accessible. To apply borders to a table, select the entire table by clicking on the crosshair icon that appears in the top-left corner when you hover over the table. With the table selected, go to the "Design" tab that appears on the ribbon. In the "Table Styles" group, you'll find various border options to choose from. Simply select the desired style to apply it to your table. You can also customize the border by using the "Borders" button in the "Table Tools" tab.
Using keyboard shortcut
Did you know that you can save time and effort by using keyboard shortcuts to insert borders in Word? Learning a few key combinations can significantly speed up your border-adding process. To insert a basic border around a paragraph, simply place your cursor within the paragraph and press "Ctrl+Shift+7" on your keyboard. This shortcut applies the default border style to the selected paragraph. For more advanced border options, including custom borders, you can use the "Alt" key along with specific numeric codes. Microsoft provides a comprehensive list of keyboard shortcuts on their official support website, which you can refer to for more information.
Conclusion
Adding borders to your Word documents can transform their appearance and make them more visually appealing. Whether you need a simple border for emphasis or a complex and custom design, Word offers several methods to help you achieve the desired result. From the built-in Page Borders feature to the flexibility of creating custom borders, you can easily enhance your documents with a few simple clicks or keystrokes. Experiment with different styles, colors, and widths to find the perfect border that complements your document. With these techniques, you'll be well-equipped to add borders to your Word documents in no time.
