If you're working on a lengthy document in Microsoft Word, it's essential to include page numbers for better organization. Page numbers not only make your document more professional and easy to navigate but also help readers refer to specific sections quickly. In this article, we will discuss how to insert page numbers in Word, step by step. So without further ado, let's dive into it!
To insert page numbers in Word, follow the steps outlined below:
Step 1: Open your document
First, open the Word document in which you want to insert page numbers. Make sure you have the document open in your Word application.
Step 2: Go to the Insert tab
Click on the "Insert" tab on the top menu bar. This tab contains various tools and options to enhance your document.
Step 3: Locate the Page Numbers option
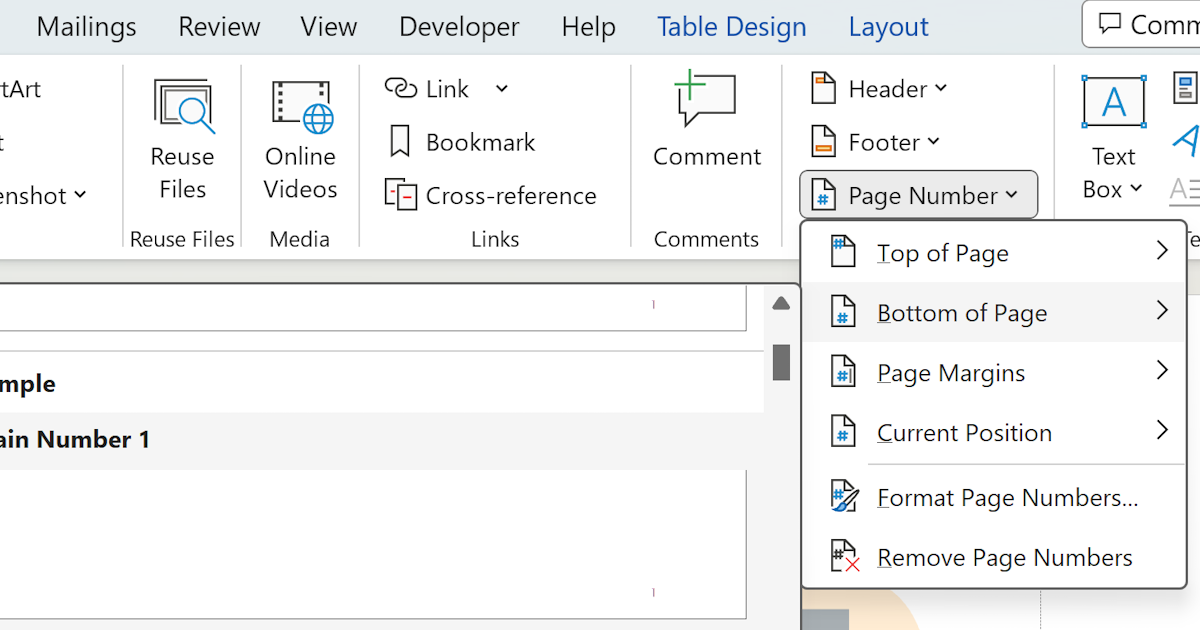
In the "Header & Footer" section of the Insert tab, you will find the "Page Number" option. Click on the dropdown arrow next to it.
Step 4: Select the desired page number format
Once you click on the "Page Number" dropdown arrow, a menu will appear with different page number formats. Choose the format that suits your document's style and requirements. You can select from options like "Top of Page," "Bottom of Page," "Page Margins," or "Current Position."
Step 5: Customize page number settings
After selecting the page number format, you can further customize the appearance and positioning of the page numbers. Click on the "Format Page Numbers" option at the bottom of the dropdown menu.
Step 6: Choose the numbering style
In the "Page Number Format" dialog box, you can select the numbering style for your page numbers. You can choose from options like "1, 2, 3," "i, ii, iii," "A, B, C," or other custom formats. Select the option that suits your document's requirements.
Step 7: Specify the starting page number
If you want to start the page numbering from a specific number other than 1, you can specify it in the "Start at" field. Simply enter the desired number and click "OK."
Step 8: Decide on the placement of page numbers
In the "Page Number Format" dialog box, you will also find options to choose the placement of the page numbers. You can select "Top of Page," "Bottom of Page," or "Page Margins" as per your preference.
Step 9: Apply page numbers
Once you have customized the page number format and settings, click "OK" to apply the changes. The page numbers will now be inserted into your document according to the chosen format and style.
Step 10: Adjust the position of page numbers
If the page numbers appear in a position that doesn't align with your document's layout, you can adjust their position manually. Simply double-click on the area where the page numbers appear, and the header or footer section will open.
Step 11: Format and style page numbers
While the page numbers are inserted, you might want to format and style them to match your document's overall design. With the header or footer section open, you can customize the font style, size, color, alignment, and other formatting options.
Step 12: Update page numbers
If you make any changes to your document's content or layout, it's important to update the page numbers accordingly. Word provides an automatic update feature for page numbers. To update the numbers, simply click on the "Update" button in the header or footer section.
Congratulations! You have successfully inserted page numbers in your Word document. You can now navigate through your document easily and refer to specific pages with convenience.
In conclusion, adding page numbers to your Word document is a simple yet crucial step for better organization and accessibility. By following the above steps, you can easily insert page numbers and customize them according to your document's requirements. So, next time you work on a lengthy report, essay, or any other document, make sure to include page numbers for a more professional and user-friendly experience.
