When it comes to Microsoft Word, the ability to insert dynamic elements such as dates can greatly enhance the functionality and efficiency of your documents. Whether you are drafting a letter, creating a report, or working on any other type of document, being able to automatically insert the current date or a specific date can save you time and effort. In this article, we will explore various methods to insert a date in Word and make your document creation process more streamlined.
Method 1: Inserting the Current Date Using the Insert Menu
If you prefer using the mouse and the menus, you can also insert the current date in Word by following these steps:
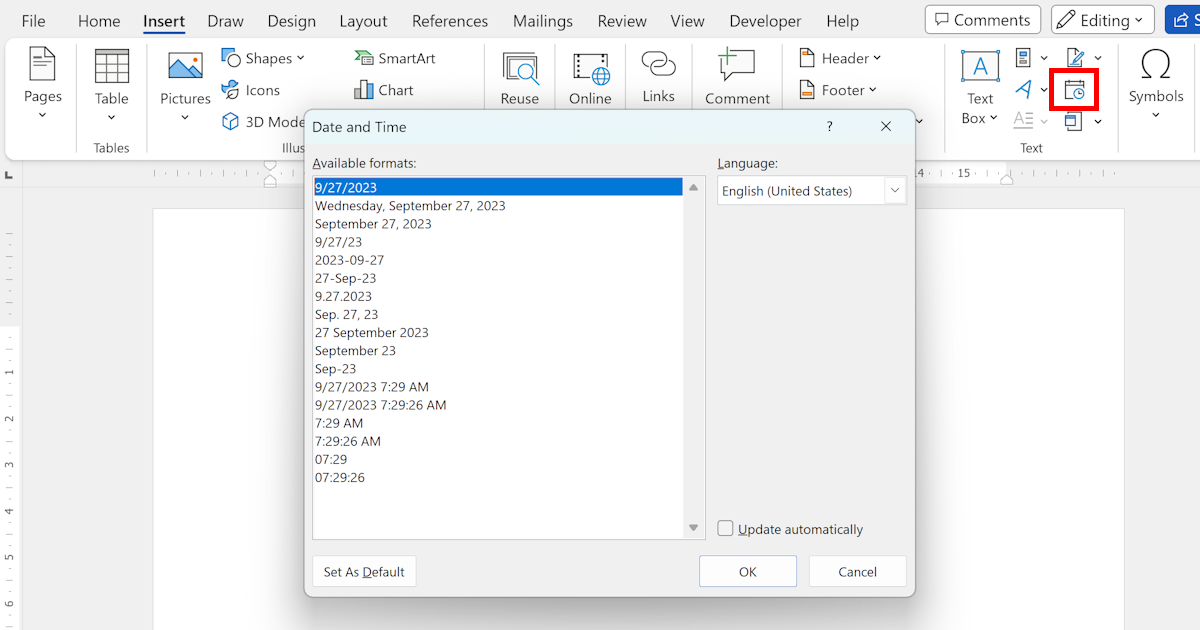
- Place your cursor at the desired location in your document.
- Go to the "Insert" tab in the Word ribbon.
- In the "Text" group, click on the "Date & Time" button.
- In the "Date and Time" dialog box, select the desired date format.
- Check the "Update automatically" box to ensure that the date gets updated every time the document is opened.
- Click on the "OK" button to insert the date into your document.
By using the "Update automatically" option, Word will keep the date up to date whenever you open the document.
Method 2: Inserting the Current Date Using a Keyboard Shortcut
One of the quickest ways to insert the current date into your Word document is by using a simple keyboard shortcut. Here's how it's done:
- Place your cursor at the desired location in your document.
- Press the "Alt" key and the "=" key simultaneously. This will activate the equation editor.
- Type "DATE" followed by an open parenthesis "(" and a closing parenthesis ")".
- Press the "Enter" key. Word will automatically replace the equation with the current date.
Using this method, Word inserts a dynamic field that will always display the current date. So, every time you open the document, the date will be updated accordingly.
Method 3: Inserting a Specific Date
In addition to inserting the current date, you may also need to insert a specific date into your Word document. This can be achieved by following these steps:
- Place your cursor at the desired location in your document.
- Go to the "Insert" tab in the Word ribbon.
- In the "Text" group, click on the "Date & Time" button.
- In the "Date and Time" dialog box, select the "Fixed" option.
- Choose the desired date from the calendar.
- Check the "Update automatically" box if you want the date to be updated every time the document is opened.
- Click on the "OK" button to insert the date into your document.
By selecting the "Fixed" option, Word will insert the specific date you have chosen, which will remain unchanged even if you open the document on a different day.
Method 4: Inserting a Date in a Header or Footer
If you want to display the date in the header or footer of your Word document, you can follow these steps:
- Go to the "Insert" tab in the Word ribbon.
- In the "Header & Footer" group, click on the "Header" or "Footer" button.
- Choose the desired header or footer style from the dropdown menu.
- Place your cursor at the desired location in the header or footer.
- Insert the date using any of the methods mentioned above (keyboard shortcut, menu, or specific date).
- Customize the formatting of the date if needed.
- Close the header or footer section to return to the main document.
By adding the date to the header or footer, you can ensure that it remains visible on each page of your Word document.
Method 5: Inserting a Custom Date Field
Apart from the current date or a specific date, Word also allows you to insert custom date fields. These fields can display dates relative to the current date or calculate future or past dates based on specific criteria. To insert a custom date field, follow these steps:
- Place your cursor at the desired location in your document.
- Press "Ctrl" + "F9" to insert a pair of field braces .
- Inside the field braces, type "DATE" followed by the desired format code.
- To display the current date, use "DATE @ " followed by the desired date format code.
- To calculate future or past dates, use "DATE @ " followed by the desired calculation.
- Press "F9" to update the field and display the result.
By using custom date fields, you can create dynamic date displays in your Word document that update based on specific criteria.
Conclusion
Microsoft Word provides various methods to insert dates into your documents, ranging from inserting the current date to adding specific or custom dates. By utilizing these methods, you can streamline your document creation process and ensure accurate and up-to-date date displays. Whether you prefer using keyboard shortcuts, menus, or custom field codes, Word offers the flexibility to meet your date insertion needs.
