Microsoft Word has at least four distinct ways to insert the current date — and picking the wrong one can mean your dates either never update or update when you don't want them to. This guide covers each method, explains when to use it, and flags the one-keystroke shortcut that most guides miss entirely.
Key Takeaways
Alt+Shift+Dinserts a live date field instantly — no menus required (Microsoft Support, 2024).- The core choice is static (date stays fixed after insertion) vs. dynamic (date updates each time the document opens).
- The Date & Time dialog and field code method both produce dynamic fields; the macro and AutoComplete methods produce static text.
- Method 2 (field code) and the original "Method 4" in many guides are the same thing —
Ctrl+F9in both cases.- For templates and reports you reuse regularly, a dynamic field is almost always the right pick.
Which Method Should You Use?
Before going through each method step by step, here's the decision table. Match your situation to the right approach and skip straight to that section.
| Situation | Best Method |
|---|---|
| You want the fastest possible way to insert a date | Alt+Shift+D shortcut |
| You need a date that updates every time the doc opens | Date & Time dialog or Alt+Shift+D |
| You want a fixed date that never changes | AutoComplete or macro |
| You need custom formatting (e.g. "23 March 2026") | Field code |
| You insert dates dozens of times a day | VBA macro with shortcut |
Method 1: Keyboard Shortcut (Alt+Shift+D)
Alt+Shift+D is the fastest way to insert today's date in Word — it works in every version from Word 2007 through Microsoft 365 and requires no dialog boxes or menus (Microsoft Q&A, 2024).
Press all three keys together. Word inserts the current date as a {DATE} field — meaning it updates automatically each time you open or print the document.
A few things worth knowing:
- The format defaults to whatever you last set as default in the Date and Time dialog. To change it, go to Insert → Date & Time, choose a format, click Set As Default, then dismiss the dialog.
- To lock the date so it stops updating, click on it and press
Ctrl+Shift+F9. This converts the dynamic field to plain, static text. - The companion shortcut
Alt+Shift+Tworks the same way for inserting the current time.
This is the method to start with for most people. It's two seconds faster than opening any menu, and it handles the most common use case — a date on a letter or report that should reflect the current date whenever the document is opened.
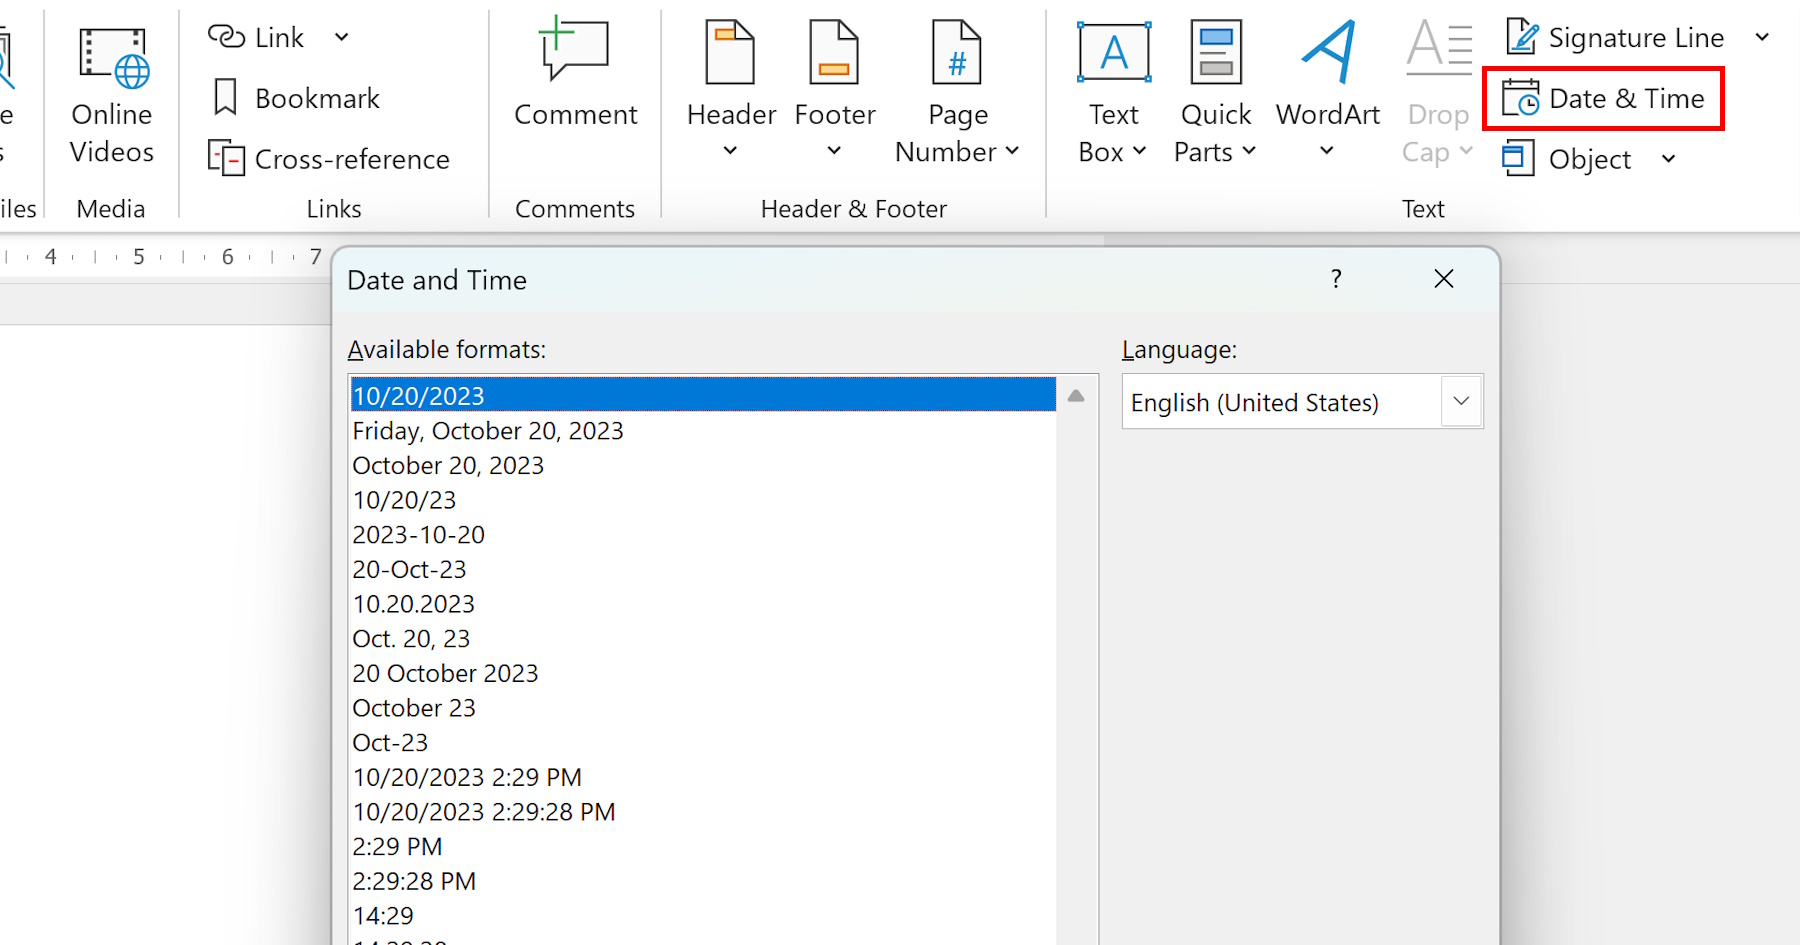
Method 2: Date & Time Dialog
The Date & Time dialog gives you a visual format chooser before inserting, which makes it useful when you need a specific date style you don't have set as default (Microsoft Support, 2024).
Steps:
- Click where you want the date to appear
- Go to the Insert tab → Text group → click Date & Time
- Choose your format from the list (Word shows a preview)
- Check Update automatically if you want a live field, or leave it unchecked for static text
- Click OK
The "Update automatically" checkbox is the key decision here. Checked means the date is a {DATE} field — it refreshes every time Word recalculates fields (typically on open). Unchecked means Word pastes the date as plain text that never changes, which is what you want for dated correspondence like contracts or signed letters.
If you find yourself always picking the same format, click Set As Default before closing the dialog. From then on, Alt+Shift+D will use that format automatically.
Method 3: AutoComplete (Static Text, No Menus)
Word's AutoComplete feature can insert the full date as plain text before you finish typing it — no fields, no shortcuts, no menus. This is the fastest way to insert a fixed date.
Start typing today's date. After the first few characters (usually three or four), Word shows a tooltip suggesting the completed date. Press Enter to accept it.
For example, typing "Mar" on a March day will typically surface "March 23, 2026" as a suggestion. Press Enter and Word inserts the full text in place.
This only works if Word's AutoComplete is enabled. Check via File → Options → Advanced and confirm "Show AutoComplete suggestions" is checked under the Editing options.
The resulting text is completely static — it won't change when you reopen the document. That makes it the right pick for anything date-stamped at a specific moment: invoices, meeting notes, sign-off lines.
Method 4: Field Code (Custom Formats)
Field codes give you precise control over date formatting beyond what the Date & Time dialog offers. This approach is the one to use when you need an unusual format — like "Monday, 23 March 2026" or a two-digit day with no leading zero.
Steps:
- Place your cursor where you want the date
- Press
Ctrl+F9— Word inserts an empty field:{ } - Inside the brackets, type the field code with your format, for example:
DATE \@ "dddd, d MMMM yyyy" - Press
F9to update and display the result
Common format switches:
| Code | Output |
|---|---|
\@ "MMMM d, yyyy" |
March 23, 2026 |
\@ "dd/MM/yyyy" |
23/03/2026 |
\@ "dddd, d MMMM yyyy" |
Monday, 23 March 2026 |
\@ "d MMM yy" |
23 Mar 26 |
One thing to watch: the curly brackets in a field code are not the { and } characters from your keyboard. You must insert them with Ctrl+F9. Typing them manually produces text, not a field.
Field codes also let you insert related date types beyond the current date. CREATEDATE shows when the document was first created. SAVEDATE updates when the document is saved. PRINTDATE updates when it's printed. These are especially useful in headers and footers for document management.
Method 5: VBA Macro (Batch or Repeated Use)
A macro makes sense if you insert dates in a specific format many times a day, or if you want to assign a custom keyboard shortcut to a format Word doesn't offer natively. VBA can cut the process to a single keystroke (MSW Tutor, 2025).
To create a date-insertion macro:
- Press
Alt+F11to open the VBA editor — or use the Developer Tab (see our guide to the Word Developer Tab for how to enable it) - Go to Insert → Module
- Paste this code:
Sub InsertStaticDate()
    Selection.TypeText Text:=Format(Now(), "MMMM d, yyyy")
End Sub
- Close the editor (
Alt+Q) and return to your document - Press
Alt+F8, selectInsertStaticDate, and click Run
This inserts a plain-text date that never updates. To assign it to a keyboard shortcut: go to File → Options → Customize Ribbon → Keyboard Shortcuts: Customize, find the macro under "Macros" in the category list, and assign any key combination not already in use.
The VBA approach is worth the setup time if you process a lot of documents. Ten seconds of configuration saves you from repetitive menu navigation indefinitely.
Frequently asked questions
How do I insert a date that never changes in Word?
Use AutoComplete (start typing the date and press Enter when Word suggests it) or the Date & Time dialog with 'Update automatically' unchecked. Both methods insert plain text that won't change on reopen. To freeze an existing dynamic field, click it and press Ctrl+Shift+F9.
Why does my date keep changing every time I open the document?
The date was inserted as a dynamic field via Alt+Shift+D, the Date & Time dialog with 'Update automatically' checked, or a DATE field code. To stop it updating, click the date and press Ctrl+Shift+F9 to convert it to static plain text at its current value.
Can I insert a date in a specific format like '23 March 2026'?
Yes. Use the field code method: press Ctrl+F9 to insert a field, then type DATE \@ "d MMMM yyyy" inside the brackets, and press F9 to display the result. You can combine d, dd, MMM, MMMM, yy, and yyyy tokens to produce almost any date format you need.
Does Alt+Shift+D work on Word for Mac?
On Mac, the equivalent shortcut is Ctrl+Shift+D in most Word versions. The behavior is the same — Word inserts a DATE field in your default format. To change the default format on Mac, go to Insert > Date & Time, choose a format, and click Default.
