When it comes to creating professional documents or formatting academic papers, Microsoft Word is the go-to word processing software for many users. One of the essential aspects of document formatting is setting and adjusting margins. In this article, we will explore everything you need to know about margins in Word, including how to set them, adjust them, and the importance of using appropriate margins for different types of documents.
What are Margins?
Margins refer to the blank spaces surrounding the content of a document. They are the empty spaces between the edge of the paper and the text. Margins play a crucial role in document layout and design as they ensure readability, create a sense of visual balance, and provide space for binding or hole punching. In Word, you can set and modify margins according to your specific requirements.
How to Set Margins in Word: Step-by-Step Guide
Setting margins in Word is a simple process. Follow these steps to set your desired margins for a new or existing document:
Open Microsoft Word: Launch the Microsoft Word application on your computer.
Open a New or Existing Document: Create a new document by selecting "Blank Document" or open an existing document you wish to modify.
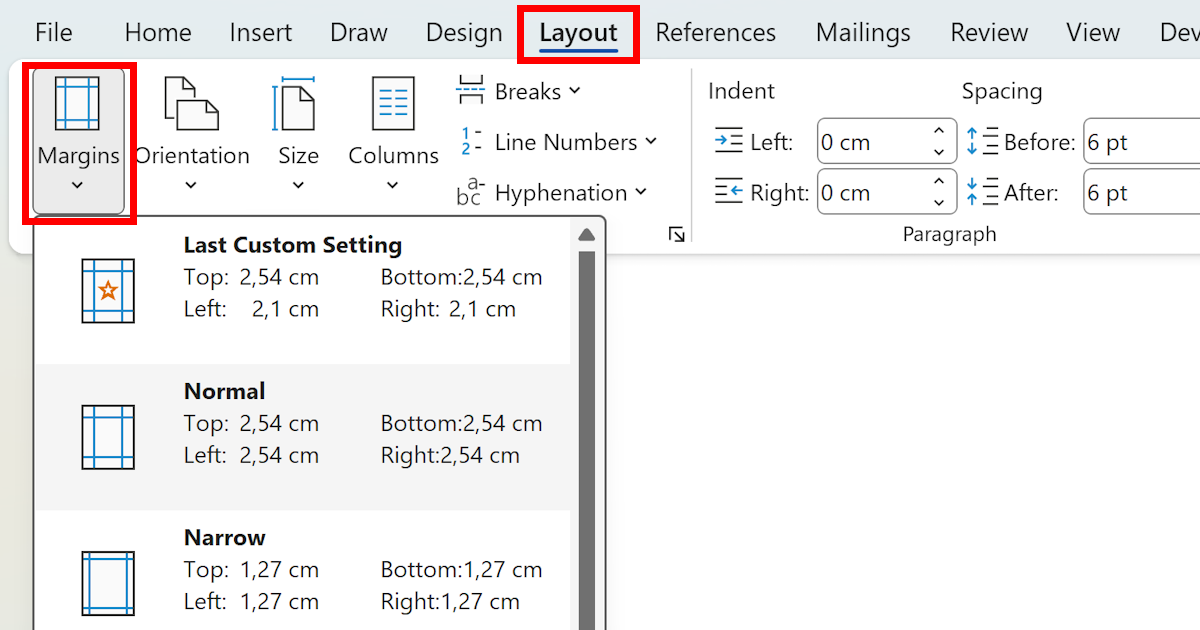
Click on the "Layout" Tab: Locate and click on the "Layout" tab in the Word ribbon at the top of the screen.
Access the "Margins" Menu: In the "Page Setup" group, click on the "Margins" button. A drop-down menu will appear, displaying various pre-set margin options.
Select a Margin Setting: Choose one of the pre-set margin options such as "Normal," "Narrow," "Moderate," or "Wide." Alternatively, click on "Custom Margins" to define your own margin settings.
Preview and Apply Margins: After selecting a margin option or customizing the margins, a preview of the margins will be displayed in the document. Click "OK" to apply the chosen margins.
Adjusting Margins in Word
In some cases, you may need to adjust the margins of a document after it has been created or when working with a template that doesn't meet your specific requirements. Here's how you can adjust margins in Word:
Open the Document: Open the document in which you want to adjust the margins.
Access the "Layout" Tab: Go to the "Layout" tab in the Word ribbon.
Click on the "Margins" Button: In the "Page Setup" group, click on the "Margins" button.
Select "Custom Margins": Choose the "Custom Margins" option from the drop-down menu. The "Page Setup" dialog box will appear.
Enter New Margin Measurement: In the "Page Setup" dialog box, you can enter new measurements for the top, bottom, left, and right margins. You can either enter specific measurements in inches or centimeters, or use the up and down arrows to adjust the margins incrementally.
Apply Margins: Once you have entered the new margin measurements, click "OK" to apply the changes.
The Importance of Using Appropriate Margins
Using appropriate margins in your documents is essential for several reasons:
Readability: Ample white space improves readability by providing visual breathing room for readers. Narrow margins can make text appear crowded and challenging to read, while wide margins may make the content look sparse.
Aesthetics: Margins play a crucial role in the visual appeal of a document. Well-proportioned and balanced margins result in a more professional and aesthetically pleasing layout.
Binding and Hole Punching: Margins are essential when preparing documents for binding or hole punching. Sufficient margin space ensures that the text does not get cut off during the binding process or interfere with the punched holes.
Annotations and Notes: Wide margins offer space for annotations, comments, or additional notes. This is particularly beneficial for research papers, legal documents, or collaborative projects where feedback and comments need to be added.
Style Guidelines: Many academic institutions and publishing houses have specific style guidelines that include requirements for margin sizes. Adhering to these guidelines ensures consistency and conformity with the desired formatting standards.
Recommended Margins for Different Documents
While the default margin settings in Word are suitable for general purposes, specific types of documents may require different margin sizes. Here are some recommendations for different document types:
Academic Papers: Most academic institutions require papers to be formatted with one-inch (2.54 cm) margins on all sides. However, always check the specific formatting guidelines provided by your institution.
Resumes and Cover Letters: For resumes and cover letters, using narrow margins (0.5-1 inch or 1.27-2.54 cm) allows for more content to fit on the page. However, ensure that the text remains readable and that the document looks professional.
Brochures and Flyers: When designing printed marketing materials, wider margins (1.5-2 inches or 3.81-5.08 cm) can help ensure that important information or graphics are not too close to the edge and risk being cut off during the printing process.
Theses and Dissertations: Graduate students often have specific margin requirements for their theses and dissertations. These requirements may vary by institution, but they typically involve one-inch (2.54 cm) margins on all sides.
Remember that these recommendations are general guidelines, and it's crucial to consult any specific formatting requirements provided by your institution or organization.
Conclusion
Setting and adjusting margins in Microsoft Word is a straightforward process that can greatly enhance the readability and aesthetics of your documents. By understanding the importance of using appropriate margin sizes for different document types, you can create professional-looking content while adhering to style guidelines and formatting requirements. Taking the time to set and adjust margins demonstrates attention to detail and ensures that your documents are visually appealing and easy to read.
