In today's digital age, it's important to know how to use various symbols and characters in our documents and messages. One commonly used symbol is the tick sign, also known as the checkmark. Whether you're creating a to-do list, a survey, or simply want to indicate completion, knowing how to insert a tick sign in Word can be quite handy. In this article, we'll explore different methods to add a tick sign in Word and make your documents more visually appealing.
Method 1: Using the Symbol Command
The simplest way to insert a tick sign in Word is by using the Symbol command. Here's how you can do it:
Open Microsoft Word and navigate to the location where you want to insert the tick sign.
Click on the Insert tab in the ribbon at the top of the screen.
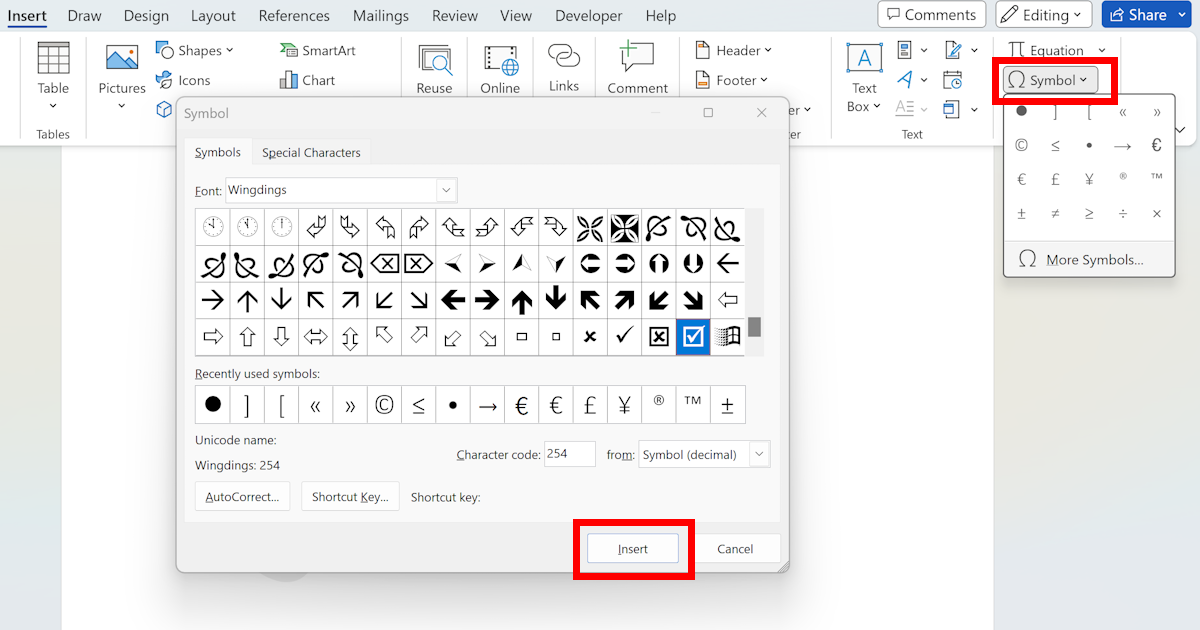
In the Symbols group, click on the Symbol button. A dropdown menu will appear.
From the dropdown menu, select More Symbols. A dialog box will appear.
In the dialog box, make sure the Symbols tab is selected.
Scroll through the list of symbols until you find the tick sign. It should look like a checkmark (√).
Click on the tick sign to select it, and then click on the Insert button. The tick sign will be inserted at the cursor's location.
Click on the Close button to close the dialog box.
That's it! You have successfully inserted a tick sign in your Word document using the Symbol command.
Method 2: Using Keyboard Shortcuts
If you're a fan of keyboard shortcuts, you'll be glad to know that there's a shortcut to insert a tick sign in Word. Follow these steps:
Open Microsoft Word and place the cursor at the desired location.
Press and hold the Alt key on your keyboard.
While holding the Alt key, type the numbers 0252 using the numeric keypad on the right side of your keyboard (not the numbers at the top of the keyboard).
Release the Alt key. The tick sign (√) will appear at the cursor's location.
Using keyboard shortcuts can save you time and make the process of inserting tick signs in Word even more efficient.
Method 3: Using AutoCorrect
If you frequently use tick signs in your documents, you can set up an AutoCorrect entry to automatically replace a specific keyword with the tick sign. Here's how:
Open Microsoft Word and go to the File tab in the ribbon.
Click on Options to open the Word Options dialog box.
In the Word Options dialog box, click on Proofing in the left-hand menu.
Click on the AutoCorrect Options button. A dialog box will appear.
In the Replace field, type a keyword that you want to associate with the tick sign (e.g., "tick").
In the With field, insert the tick sign using one of the methods mentioned earlier (e.g., by using the Symbol command).
Click on the Add button, and then click on OK to close the AutoCorrect dialog box.
Now, whenever you type the keyword you specified (e.g., "tick") followed by a space or punctuation mark, Word will automatically replace it with the tick sign (√).
Method 4: Using a Font or Wingdings
Another way to insert a tick sign in Word is by using a specific font or symbol set that includes the tick sign. One popular option is to use the Wingdings font. Here's how:
Open Microsoft Word and go to the location where you want to insert the tick sign.
Click on the Home tab in the ribbon.
In the Font group, click on the Font dropdown menu. A list of available fonts will appear.
Scroll through the list until you find the Wingdings font and select it.
Type the letter a on your keyboard. A tick sign (√) will appear at the cursor's location.
Using the Wingdings font allows you to easily insert a tick sign without depending on symbols or special characters.
Conclusion
In this article, we explored different methods to add a tick sign in Word. Whether you prefer using the Symbol command, keyboard shortcuts, AutoCorrect, or a specific font like Wingdings, now you have the tools to enhance your documents with tick signs. Experiment with these methods and find the one that suits your workflow best. Happy ticking!
