Learn how to use merge tags to automatically populate snippets with user details, shared workspace values, and values entered into snippet fields — without any manual input.
Merge tags
Merge tags are placeholders you insert into a snippet that get replaced with real values automatically when the snippet is used. Unlike fields — where the user types something in — merge tags fill themselves in. No input needed.
They're useful for things that are always known at the time of use: who's sending the message, what the organization is called, or the value a user already entered into a field earlier in the same snippet.
- You need an Admin or Manager role to edit snippets.
- Open an existing snippet for editing, or create a new one via
+ Create new → Text snippet.
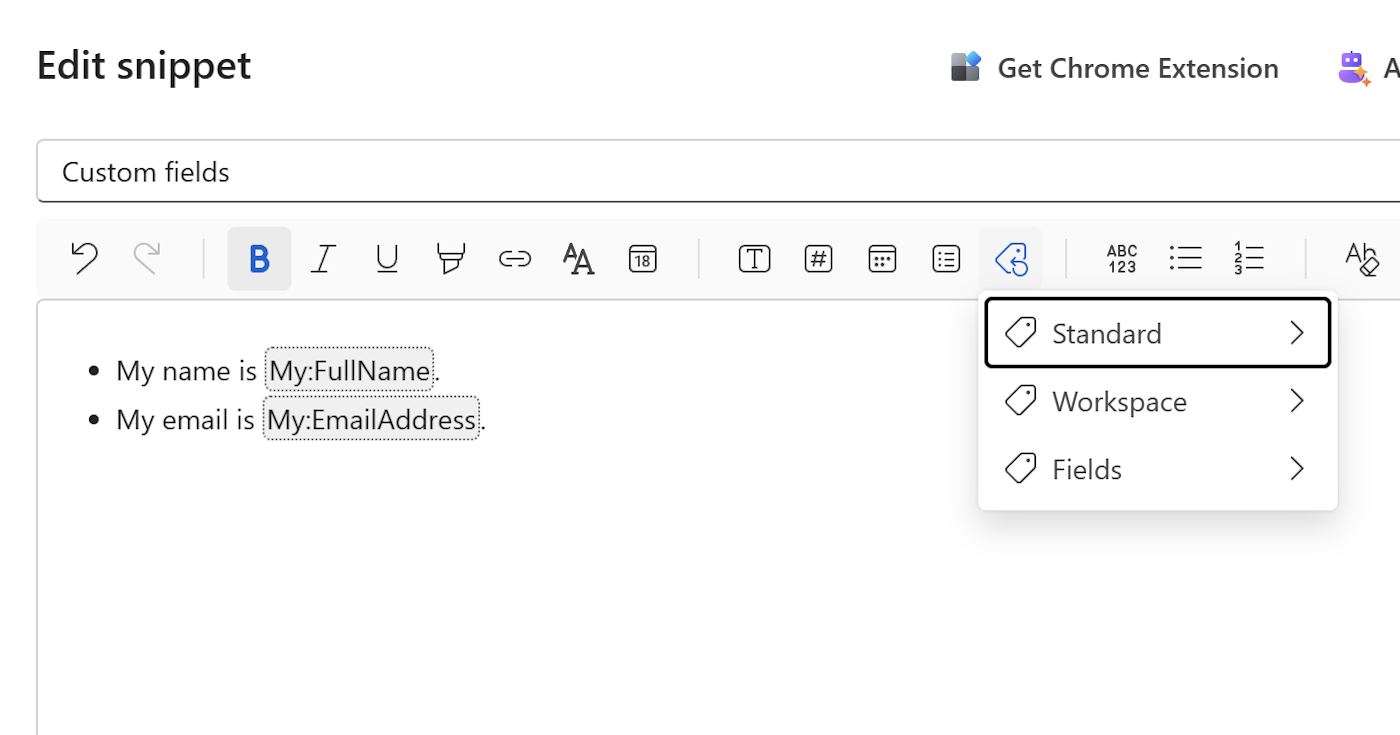
How to insert a merge tag
- Place your cursor in the snippet body where the value should appear.
- Click the Insert merge tag button in the toolbar (the tag icon).
- A submenu opens with three categories: Standard, Workspace, and Fields.
- Browse to the tag you want and click it to insert it.
The tag appears as a labeled placeholder in the editor. When anyone uses the snippet, it's replaced with the actual value automatically.
Standard tags
Standard tags pull in details about the person who is currently using the snippet. They're available in every snippet, in every workspace, with no setup required.
| Tag | What it inserts |
|---|---|
My:FullName |
Full name of the person using the snippet |
My:EmailAddress |
Email address of the person using the snippet |
Organization:Name |
The organization name entered in workspace settings |
To insert a standard tag:
- Click Insert merge tag in the toolbar.
- Select
Standard. - Click the tag you want — for example,
My:FullName.
Tip
My:FullName is great for sign-offs. Add it to the bottom of any reply snippet and every team member gets a personalized closing automatically — no one has to remember to change the name.
Workspace tags
Workspace tags reference shared values that an Admin has defined for the entire workspace — things like a company address, a support phone number, a legal entity name, or a standard terms URL. When an Admin updates a workspace value, it updates everywhere it's been used automatically.
To insert a workspace tag:
- Click Insert merge tag in the toolbar.
- Select
Workspace. - Click the value you want to insert from the list.
If the list is empty or a value you need isn't there yet, an Admin can add it.
To add or manage workspace values (Admins only):
- Click
Workspace → Manage workspace values...at the bottom of the Workspace submenu, or go toAdministration → Generaland clickEdit workspace values. - In the Workspace values dialog, click
Add new value. - Enter a Name (used to identify the tag) and a Value (what gets inserted).
- Click
Save.
Note
Only Admins can create or edit workspace values.
Managers and Members can insert existing workspace tags into snippets, but cannot add new ones.
Field tags
Field tags let you reference the value a user enters into a named field elsewhere in the same snippet. This means a user fills something in once, and it can appear multiple times throughout the snippet automatically.
For example: a snippet has a text field named CustomerName near the top. By inserting a Fields → CustomerName tag in the body and the closing line, the customer's name appears in both places — the user only types it once.
To insert a field tag:
- Click Insert merge tag in the toolbar.
- Select
Fields. - Click the field name you want to reference.
Note
A field only appears in this menu if it has been given a Name in its field dialog. Unnamed fields cannot be referenced by merge tags. See Fillable fields in snippets for how to name a field.
Combining tags and fields
Tags and fields work well together. A common pattern:
- A text field named
RecipientNameat the top lets the user type in the customer's name. - A
Fields → RecipientNametag in the greeting line inserts that name automatically. - A
My:FullNamestandard tag in the sign-off personalizes the closing for whoever is sending it. - An
Organization:Nameworkspace tag in the footer always shows the correct company name, even if it changes.
The user fills in one field. Everything else is handled automatically.